Getting Started On Hetzner & Basic Server Setup
Updated: 20 Feb 2016Hetzner provides an informative wiki with detailed guides. That should be enough to get you started, if are comfortable with CLI and have fiddled with servers before.
Here’s my notes on how I do it and what I know.
-
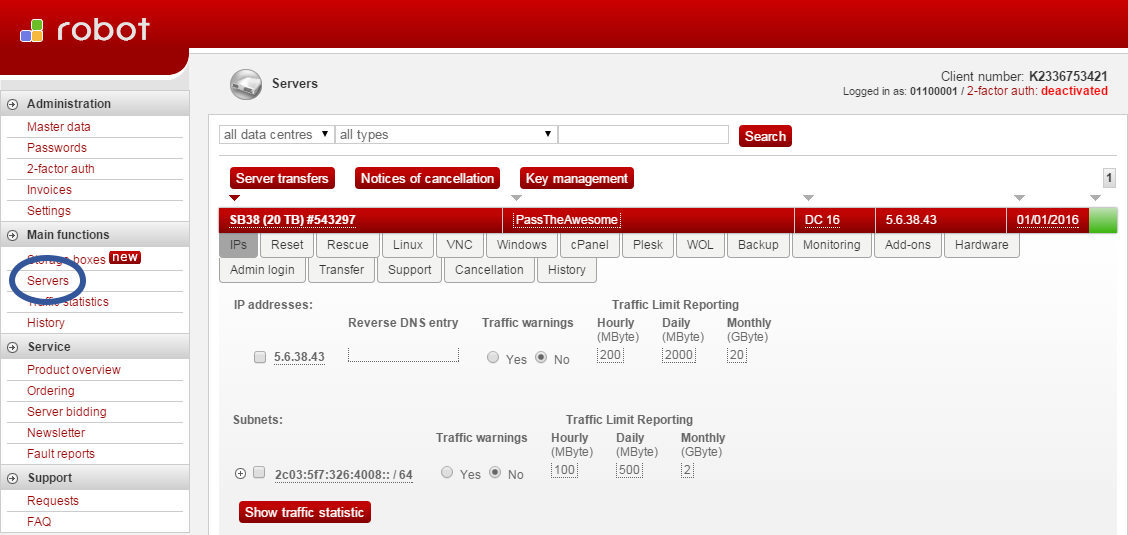
You can cancel your dedicated server (Robot admin > Cancellation) within 14 days of ordering it if you are unhappy with the service and get a refund.
-
You can reboot your server (Robot admin > Reset) at any time, and if for some reason that doesn’t work, you can request a manual hardware reset for Hetzner enginners to do it from the data center (only 1 manual hardware reset is free per month, but you won’t need it often, if ever).
-
As my HDDs are 3 TB each, I must create a GUID partition table (GPT) on the disks rather than the more common (usual approach) MS-DOS partition table because the latter has a limit of 2 TiB per partition. Simply put, that means my
/homepartition cannot be more than 2 TiB, so the remaining 1 TB would have be allocated to the root (/) partition. That’s not very nice. -
As the server comes with two HDDs (3 TB each), I’ll be setting up software RAID 1, just so that if one disk fails there’s a good chance the other one would have all the content. That means my storage will effectively become 3 TB, but I’d feel better with improved data safety than the lure of 6 terabytes of storage.
Set Up GUID Partition Table (GPT)
The GUID partition table (GPT) is needed in order to bypass the 2 TiB partition size limit of the older, but more common, MS-DOS partition table.
So if I wanted to stick with, MS-DOS partition table, I’d have to create partitions like so:
swap  - swap - 8G
/boot - ext3 - 512M
/     - ext4 - 1024G
/home - ext4 - all
As you can see, I’d have to allocate 1 TB to / (root) so that /home, an extended partion of /, doesn’t go over the partition size limit of 2 TiB. The space on the root partition is pretty much used for installing applications to and I don’t want to have to store my content files in two different places (i.e. under / and /home).
Instead if I create a GUID partition table for the entire disk, partitioning can be as simple as this:
swap  - swap - 8G
/boot - ext3 - 512M
/     - ext4 - all
As you can see, the root partition gets all the remaining space, which means /home which’d reside within / can use all the space that’s available.
Let’s go ahead and create a GPT disk label (partition table) for the entire disk. Note that we are creating just the disk label without any of the said partitions (swap, /boot, /) as they’ll be created using an automated script later.
-
Log into the server via SSH as
rootusing the password received via email. -
Display the detected drives using
lsblkorpartedcommands.# lsblk NAME MAJ:MIN RM SIZE RO TYPE MOUNTPOINT sda 8:0 0 2.7T 0 disk ├─sda1 8:1 0 8G 0 part │ └─md0 9:0 0 8G 0 raid1 [SWAP] ├─sda2 8:2 0 512M 0 part │ └─md1 9:1 0 511.7M 0 raid1 /boot ├─sda3 8:3 0 32G 0 part │ └─md2 9:2 0 32G 0 raid1 / ├─sda4 8:4 0 2.7T 0 part │ └─md3 9:3 0 2.7T 0 raid1 /home └─sda5 8:5 0 1M 0 part sdb 8:16 0 2.7T 0 disk ├─sdb1 8:17 0 8G 0 part │ └─md0 9:0 0 8G 0 raid1 [SWAP] ├─sdb2 8:18 0 512M 0 part │ └─md1 9:1 0 511.7M 0 raid1 /boot ├─sdb3 8:19 0 32G 0 part │ └─md2 9:2 0 32G 0 raid1 / ├─sdb4 8:20 0 2.7T 0 part │ └─md3 9:3 0 2.7T 0 raid1 /home └─sdb5 8:21 0 1M 0 part(OR)
 # parted

 GNU Parted 2.3
 Using /dev/sda
 Welcome to GNU Parted! Type 'help' to view a list of commands.
 (parted) print devices
 /dev/sda (3001GB)
 /dev/sdb (3001GB)
 /dev/md0 (8586MB)
 /dev/md1 (537MB)
 /dev/md2 (34.3GB)
 /dev/md3 (2957GB)
 (parted)
As you can see,
/dev/sdaand/dev/sdbrepresent the hard disks, which is all that matters to us. (If you should know,sda*andsdb*are all existing partitions on the hard disks;md*represents software RAID 1 partitions unified across the two disks.) -
Use GNU Parted (
parted) program to create a GPT disk label for the two disks. (It’s okay if you aren’t asked any of the questions when you run the commands as shown below.)# parted GNU Parted 2.3 Using /dev/sda Welcome to GNU Parted! Type 'help' to view a list of commands. (parted) select /dev/sda Using /dev/sda (parted) mklabel gpt Warning: The existing disk label on /dev/sda will be destroyed and all data on this disk will be lost. Do you want to continue? Yes/No? y Error: Partition(s) 1, 2, 3, 4 on /dev/sda have been written, but we have been unable to inform the kernel of the change, probably because it/they are in use. As a result, the old partition(s) will remain in use. You should reboot now before making further changes. Ignore/Cancel? c (parted) quit -
rebootas suggested by the program. You won’t be able to connect to the server via SSH as you’d erased an entire disk before reboot. To get around this problem:-
Go to Robot Admin > ‘Rescue’ tab > select ‘Linux’ as OS > select ‘64 bit’ as Architecture > hit ‘Activate rescue system’ > note the password provided. This will be password you’ll use for
rootthe next time you login. -
Then go to ‘Reset’ tab > select ‘Send CTRL+ALT+DEL to the server’ > hit ‘Send’. This will reboot the server. Rebooting is necessary for the Rescue system to come info force. You should now login with the new password you saved in the previous step.
-
-
Continue with formatting
/dev/sda.# parted (parted) select /dev/sda Using /dev/sda (parted) mklabel gpt Warning: The existing disk label on /dev/sda will be destroyed and all data on this disk will be lost. Do you want to continue? Yes/No? y (parted) mkpart primary 0% 100% (parted) print Model: ATA ST33000650NS (scsi) Disk /dev/sda: 3001GB Sector size (logical/physical): 512B/512B Partition Table: gpt Number Start End Size File system Name Flags 1 1049kB 3001GB 3001GB primary (parted) quit -
Repeat the same steps for
/dev/sdb(I have two HDDs remember?). -
Both HDDs now have GPT disk labels for the entire space on them, and so we are ready to run the OS installation script.
Installing Ubuntu Server Using Installimage Script
Installing the OS, configuring software RAID and partitions is very easy using the Installimage script provided by Hetzner. Depending upon your server specs the script will decide most of the configuration for you.
Just so we don’t face any issues later on (esp. for the rescue system/Installimage to understand the current state of your disks for auto config), let’s ‘Rescue’ and ‘Reset’ the server as detailed in step-4 in the previous section. Note that once you’ve done that you’ll have a new password for ‘root’, again.
We’ll basically be following the steps detailed in Hetzner Wiki for installimage here.
-
Login and run the Installimage script:
# installimage -
Select the OS - Ubuntu, OS image - Ubuntu 14.04 LTS (Trusty Tahr), and ‘OK’ the next step that follows.
-
Configure Installimage script. Read, it’s self-explanatory. This is what mine looks like. Hit
F10key to save and quit the editor and let Installimage configure the server. -
Select ‘Yes’ for any other questions the script asks you.
-
Reboot. (You can simply run the
rebootcommand.)
Software RAID 1
Run cat /proc/mdstat (or watch cat /proc/mdstat to keep it running) to check how the software RAID is doing. It’d look like this:
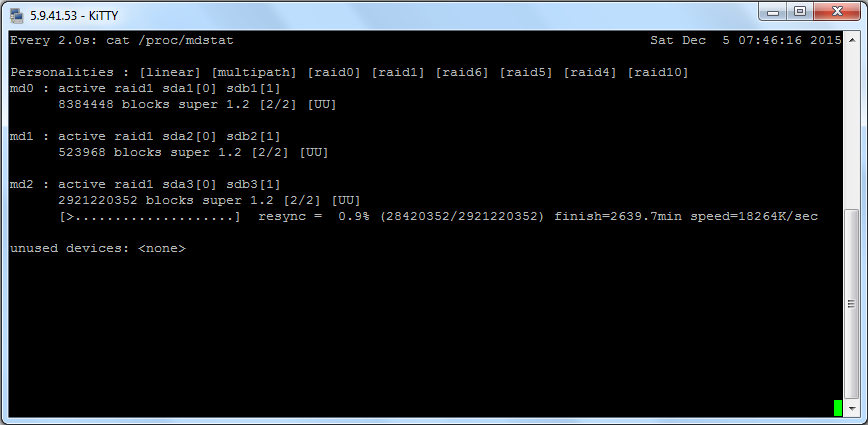
It’s the software RAID 1 in action showing that the two disks in array are being synchronised. It’s going to take many hours to complete depending upon the size of the disks, so you may hit CTRL + C and logout. Wait until the syncing is done.
Once the disks in RAID are in sync, this is what the output of cat /proc/mdstat would look like:
Every 2.0s: cat /proc/mdstat

Personalities : [linear] [multipath] [raid0] [raid1] [raid6] [raid5] [raid4] [raid10]
md0 : active raid1 sda1[0] sdb1[1]
      8384448 blocks super 1.2 [2/2] [UU]

md1 : active raid1 sda2[0] sdb2[1]
      523968 blocks super 1.2 [2/2] [UU]

md2 : active raid1 sda3[0] sdb3[1]
      2921220352 blocks super 1.2 [2/2] [UU]

unused devices: <none>
If the RAID array is intact, it shows [UU]. A missing or defective drive is shown by [U_] (for sdb) or [_U] (for sda). Here’s an example (also notice the (F) next to the failed drive):
# cat /proc/mdstat
Personalities : [raid1]
md3 : active raid1 sda4[0] sdb4[1](F)
      1822442815 blocks super 1.2 [2/1] [U_]

md2 : active raid1 sda3[0] sdb3[1](F)
      1073740664 blocks super 1.2 [2/1] [U_]

md1 : active raid1 sda2[0] sdb2[1](F)
      524276 blocks super 1.2 [2/1] [U_]

md0 : active raid1 sda1[0] sdb1[1](F)
      33553336 blocks super 1.2 [2/1] [U_]

unused devices: <none>
In this case, drive /dev/sdb has issues that need to be adressed.
Lastly, lets check if the partitions are properly aligned for best performance using align-check optimal * where * is the partition number shown when you run print as shown below.
# parted
GNU Parted 2.3
Using /dev/sda
Welcome to GNU Parted! Type 'help' to view a list of commands.

(parted) select /dev/sda
Using /dev/sda

(parted) print
Model: ATA ST33000650NS (scsi)
Disk /dev/sda: 3001GB
Sector size (logical/physical): 512B/512B
Partition Table: gpt

Number  Start   End     Size    File system  Name  Flags
 4      1049kB  2097kB  1049kB                     bios_grub
 1      2097kB  8592MB  8590MB                     raid
 2      8592MB  9129MB  537MB                      raid
 3      9129MB  3001GB  2991GB                     raid

(parted) align-check optimal 1
1 aligned

(parted) align-check optimal 2
2 aligned

(parted) align-check optimal 3
3 aligned

(parted) align-check optimal 4
4 aligned

(parted) quit
Clearly all the partitions on /dev/sda aligned. Do the same for /dev/sdb.
Software RAID Maintenance
It is good practice to regularly run data scrubbing to check for and fix errors. The standard Linux software RAID tool mdadm (multiple devices administration utility) itself has no option for this yet.
Ubuntu/Debian generally have a cronjob in /etc/cron.d/mdadm that runs the checkarray script (that comes with mdadm) at 00:57 on the first Sunday of each month. Depending on the size/configuration of the array, a scrub may take multiple hours to complete.
You may also do the check manually:
# /usr/share/mdadm/checkarray -a

checkarray: I: array md0 created recently, skipping...
checkarray: I: array md1 created recently, skipping...
checkarray: I: array md2 created recently, skipping...
(As we’ve only just setup the RAID array, the system found no reason to check the disks for data integrity just yet.)
Then there’s a manual check that can be triggered via sysfs. I find it better than checkarray because the check operation scans the drives for bad sectors and attempts to automatically repair them.
To initiate a data scrub:
# echo check > /sys/block/md0/md/sync_action
Once the scrub is complete, you may check how many blocks have been flagged as bad:
# cat /sys/block/md0/md/mismatch_cnt
0
And to stop a currently running data scrub safely:
# echo idle > /sys/block/md0/md/sync_action
Update The System
Nothing new, simply run: apt-get update && apt-get -y upgrade
In doing so, sometimes, you may be presented with this:
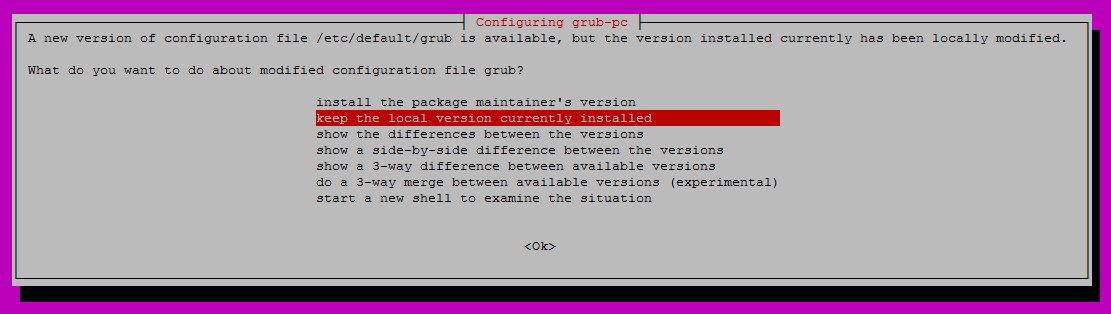
Here’s what I did:
-
Download the current locally-installed version of the grub config. file (
/etc/default/grub) via SFTP. Maybe name it grub-old. -
Back in the terminal/console, choose to “install the package maintainer’s version”. In the next screen you may be asked to choose the devices to install GRUB boot loader to. I only selected
/dev/sdabecause I’d like to let the software RAID do the syncing with/dev/sdbrather than let (possibility) grub mess up the sync/RAID in any way.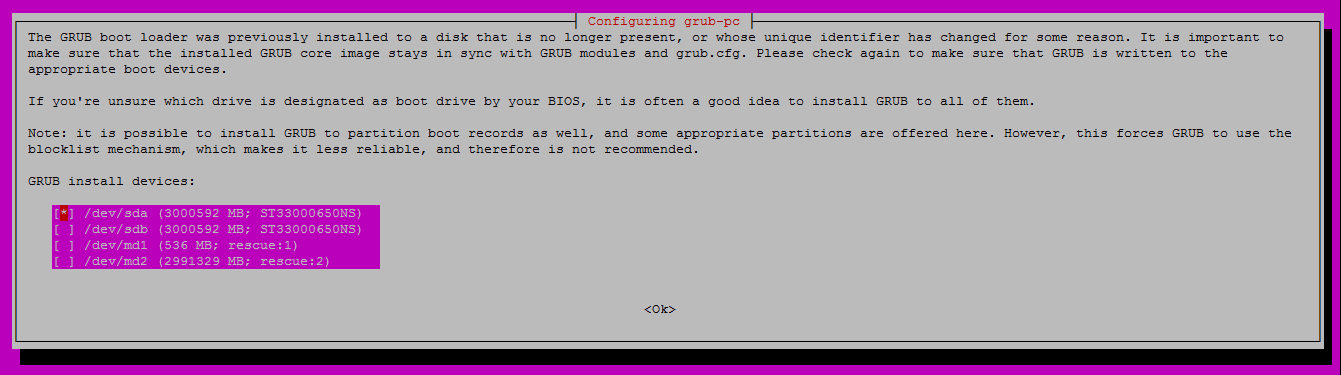
-
Let the update process complete.
-
rebootjust to be safe all changes are applied. -
Confirm there are no RAID sync issues.
 # cat /proc/mdstat
 Personalities : [linear] [multipath] [raid0] [raid1] [raid6] [raid5] [raid4] [raid10]
 md0 : active raid1 sdb1[1] sda1[0]
       8384448 blocks super 1.2 [2/2] [UU]

 md1 : active raid1 sdb2[1] sda2[0]
       523968 blocks super 1.2 [2/2] [UU]

 md2 : active raid1 sdb3[1] sda3[0]
       2921220352 blocks super 1.2 [2/2] [UU]

 unused devices: <none>
The devices are in sync, no issues there.
-
Check if the two devices (
/dev/sda,/dev/sdb) have the same partitions.# parted GNU Parted 2.3 Using /dev/sda Welcome to GNU Parted! Type 'help' to view a list of commands. (parted) print Model: ATA ST33000650NS (scsi) Disk /dev/sda: 3001GB Sector size (logical/physical): 512B/512B Partition Table: gpt Number Start End Size File system Name Flags 4 1049kB 2097kB 1049kB bios_grub 1 2097kB 8592MB 8590MB raid 2 8592MB 9129MB 537MB raid 3 9129MB 3001GB 2991GB raid (parted) select /dev/sdb Using /dev/sdb (parted) print Model: ATA ST33000650NS (scsi) Disk /dev/sdb: 3001GB Sector size (logical/physical): 512B/512B Partition Table: gpt Number Start End Size File system Name Flags 4 1049kB 2097kB 1049kB bios_grub 1 2097kB 8592MB 8590MB raid 2 8592MB 9129MB 537MB raid 3 9129MB 3001GB 2991GB raid (parted) quitThey do.
-
Now download the new package maintainer’s version of the grub config. file (
/etc/default/grub) via SFTP. Maybe name it grub-new. -
Compare the two and make changes as you feel necessary. Here are my grub-old, grub-new, and the final grub config. file that I am using now.
-
reboot(probably not necessary, but I do it just to be safe) and run the system update process to check if there any issues with updates.# apt-get update && apt-get -y upgrade
Set The Timezone
View the current date and time according to your server:
# date
Mon Dec  7 17:42:27 CET 2015
To view the list of available time zones and pick one of your choice (for UTC, select None of the above > UTC):
# dpkg-reconfigure tzdata

Current default time zone: 'Etc/UTC'
Local time is now:      Mon Dec  7 16:43:47 UTC 2015.
Universal Time is now:  Mon Dec  7 16:43:47 UTC 2015.
Add Sudo User; Disable Root User
root has unlimited privileges and can execute any command. So for added security and just so you don’t accidentally break our server, create a limited user account with sudo (administrative) privileges. (I use 63 random alpha-numeric character password generated by GRC’s password generator.)
adduser pinky
adduser pinky sudo
To improve security and make it difficult for attackers to access our server, let’s:
-
Change the default SSH port (from 22 to a random conflict-free port between 10001-65535) and configure the firewall (
ufw) appropriately. -
Disable root login while only allowing our user account (
pinky) to login via SSH. -
Turn off x11 forwarding and DNS.
To do so, modify the following SSH daemon options in /etc/ssh/sshd_config:
Port 43713
PermitRootLogin no
X11Forwarding no
Then add the following lines to the bottom of the same file:
UseDNS no
AllowUsers pinky
Restart SSH daemon for the changes to take effect:
service ssh restart

NOTE: If Ubuntu 15.10+, use this instead
systemctl restart sshd
(It’s important that you finish with the firewall configuration as shown below if you want to continue with the rest of the setup process later.)
Configure Uncomplicated Firewall (UFW)
UFW comes preinstalled on Ubuntu, but not enabled.
# ufw status
Status: inactive
But before enabling UFW, we need to make ensure that the firewall is properly configured.
Use the ufw default command to set the default response to incoming and outgoing connections. To deny all incoming and allow all outgoing connections, run:
ufw default allow outgoing
ufw default deny incoming
We do that as we need only a small amount of ports open for incoming connections, and it’s best to add explicit allow rules for them. Below I’ve opened ports for services that I need. At the very least you need to open the SSH port just so you aren’t locked out of your server.
ufw allow 43713 # SSH
ufw allow 80/tcp # HTTP
ufw allow 443 # HTTPS
Also if your server is IPv6-enabled, make sure you’ve enabled support for it in UFW config. (in /etc/default/ufw file):
IPV6=yes
Now that the basic config. is in place, enable UFW:
ufw enable
Check:
$ ufw status verbose

Status: active
Logging: on (low)
Default: deny (incoming), allow (outgoing), allow (routed)
New profiles: skip

To                         Action      From
--                         ------      ----
80/tcp                     ALLOW IN    Anywhere
443                        ALLOW IN    Anywhere
43713                      ALLOW IN    Anywhere
80/tcp (v6)                ALLOW IN    Anywhere (v6)
443 (v6)                   ALLOW IN    Anywhere (v6)
43713 (v6)                 ALLOW IN    Anywhere (v6)
Now without closing the currently open root user shell session, open a new terminal and test logging in with your newly created user + modified SSH port. If it works, close the root session and continue with your new user account. Use sudo for administrative/super user privileges when necessary.
Sources
-
Hetzner: Root Server Guide
-
Hetzner: Partition size limit for large disks
-
ArchWiki: RAID Maintenance
-
Linode: Getting Started with Linode
-
Liquid Web: Changing The SSH Port
-
Jesse Schoff’s rTorrent + ruTorrent Configuration Guide